



Flexible heaters are often selected because they can deliver controlled heat in areas where conventional heaters are too rigid, bulky, or difficult to integrate. Their thin construction, custom geometry, and ability to conform to complex surfaces make them useful across medical, industrial, electronics, and food-processing applications.
However, simply applying power to a flexible heater does not guarantee that the surrounding system will heat evenly. Thermal distribution depends on the heater construction, watt density, mounting method, materials within the assembly, airflow, thermal mass, and the way heat moves through the complete system.
Understanding those variables early in the design process can help engineers reduce hot spots, improve temperature consistency, and achieve the required warm-up time.
What Is a Resistive Flexible Heater?
A resistive flexible heater converts electrical energy into heat through a fixed-resistance heating element. When current passes through the resistive circuit, electrical resistance generates thermal energy.
The heating element is typically laminated between thin dielectric layers such as polyimide or silicone rubber. This construction creates an extremely thin heating solution that can be mounted directly against the component or surface requiring heat.

Flexible heaters can also be highly customized. Depending on the application, engineers can specify:
- Heater shape and overall dimensions
- Resistance and power output
- Multiple heating zones
- Lead wire type and attachment location
- Temperature sensors
- Cutouts, holes, and mounting features
- Adhesive backing
- Silicone or polyimide construction
This versatility gives engineers considerable control over where heat is generated and how it enters the surrounding assembly.
Do Flexible Heaters Heat Uniformly?
A flexible heater can be designed to generate relatively uniform heat across its active area, but that does not necessarily mean the complete system will reach a uniform temperature.
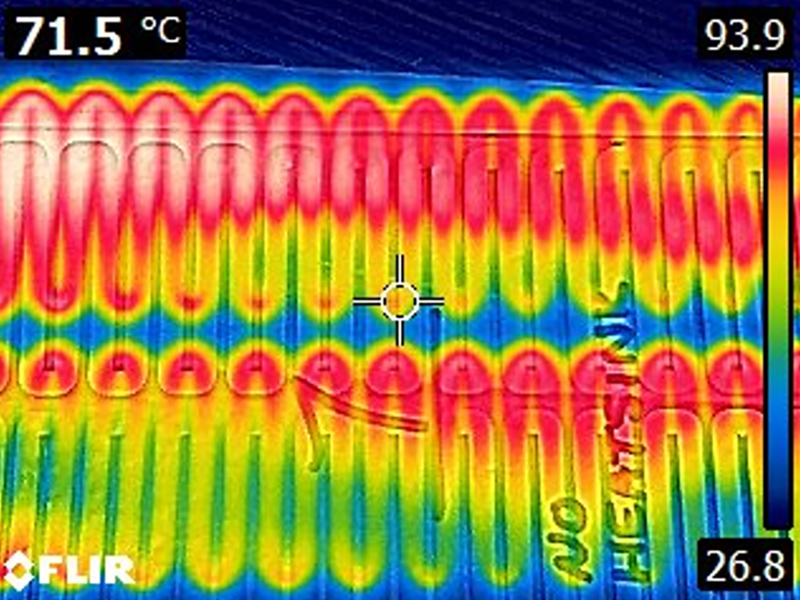
Polyimide heater showing localized hotspots.
The heater is only one part of the thermal system.
A metal plate, for example, may conduct heat efficiently away from the heater. A plastic housing may transfer heat much more slowly. Fasteners, openings, insulation, airflow, fluid movement, and variations in material thickness can also create areas of higher or lower heat loss.
For this reason, heater design should account for the heat load at different locations within the system.
In some applications, uniform watt density is appropriate. In others, the heater may require multiple heat zones with variable power densities so that additional power is directed toward areas experiencing greater heat loss.
Applications That Require Controlled Thermal Distribution
Precise thermal distribution is particularly important when temperature directly affects performance, product quality, or process reliability.
Biological specimens may require controlled warming or thawing without creating localized hot spots. LCD displays may need supplemental heat to remain operational at low ambient temperatures. Oil tanks and lubrication systems may require enough heat to maintain viscosity and fluid flow without overheating nearby components.
Flexible heaters are also used in food-processing equipment, including systems that generate or maintain steam. These applications may require tight control over both heat input and temperature distribution.
In each case, the challenge is not simply generating heat. It is delivering the correct amount of thermal energy to the correct location.
The Three Forms of Heat Transfer
Understanding how heat moves through the assembly is fundamental to flexible heater design.
1. Conduction
Conduction is the primary method of heat transfer for a flexible heater.
Heat moves directly from the heater into another material through physical contact. A heater bonded to an aluminum plate, for example, transfers thermal energy directly into the plate.
Good physical contact is therefore critical. Any interruption between the heater and mounting surface can significantly change thermal performance.
2. Convection
Convection transfers heat through the movement of air, gas, or liquid around the heater.
Natural convection occurs whenever heated air rises from the heater surface. Forced convection becomes more significant when fans, pumps, or some type of airflow are present.
Airflow can remove substantial heat from specific portions of an assembly and may require additional watt density in those areas.
3. Radiation
All heated surfaces emit some thermal radiation. However, radiation generally represents a much smaller portion of heat transfer in most flexible heater applications compared with conduction and convection.
It should still be considered at elevated temperatures or in applications where the heater is not in direct contact with another surface.
Understand the Complete Thermal System
Before finalizing the heater materials, geometry, or watt density, engineers should study how thermal energy moves throughout the entire assembly.
Start by identifying all heat sources and heat-loss paths. Determine how heat travels from the heater into adjacent materials and how quickly those materials conduct or store thermal energy.
Thermal mass is particularly important. A large aluminum structure may require considerable energy during startup but distribute that heat efficiently once warm. A thin polymer component may heat rapidly but provide relatively little thermal mass once warmed.
Material thermal conductivity, specific heat, thickness, surface area, airflow, operating temperature, and environmental conditions should all be considered.
The goal is to design the heater around the thermal behavior of the assembly rather than treating the heater as an isolated component.
5 Tips for Improving Thermal Distribution
1. Select the Encapsulation Material Carefully
Flexible heater construction can affect how heat spreads across the surface.
Silicone rubber heaters are often well suited for applications where heat spreading and conformity are important. Silicone construction can also accommodate thicker heater assemblies and irregular mounting surfaces.
Polyimide heaters provide an extremely thin profile and are commonly selected where space, weight, or precise geometry is critical. Polyimide heaters also warm the fastest but may experience localized hot spots.
Material selection should account for temperature range, flexibility, dielectric strength, chemical exposure, thickness, and thermal requirements.
2. Select the Correct Pressure-Sensitive Adhesive
The adhesive layer between the heater and the heated surface becomes part of the thermal path.
Common transfer adhesives such as 3M 467MP and 468MP can provide strong bonding while maintaining close contact between the heater and mounting surface.
Proper application pressure and surface preparation are critical. Poor adhesion can increase thermal resistance and create uneven temperature distribution.
3. Eliminate Air Gaps
Even a small air gap can create a significant change in local heat transfer.
Air has relatively low thermal conductivity compared with metals and many other solid materials. A bubble, wrinkle, surface irregularity, or poorly bonded section beneath the heater can therefore act as an insulating region.
The result may be a colder area in the heated component while the heater itself operates at a higher local temperature.
Flat mounting surfaces, proper adhesive installation, adequate pressure, and appropriate mechanical retention can help maintain continuous thermal contact.
4. Use Multiple Heating Zones When Necessary
Complex assemblies do not always have uniform heat loads.
One portion of a flexible heater may be located near a metal bracket that draws heat away quickly, while another may sit near an insulated section that loses very little energy.
Rather than applying the same watt density everywhere, a custom resistive pattern can be designed with different heating zones.
These zones can provide greater power where heat losses are highest and reduced power where less energy is required. Proper zoning can improve temperature uniformity without unnecessarily increasing total heater wattage.
5. Consider Thermally Conductive Adhesives for Fast Warm-Up
Applications requiring very fast warm-up times or aggressive temperature ramp rates may benefit from a thermally conductive adhesive such as 3M 8810.
These materials can reduce thermal resistance between the heater and mounting surface, allowing energy to move into the assembly more efficiently.
However, thermal performance should not be considered independently from mechanical performance. Thermally conductive adhesives may provide lower bond strength than conventional pressure-sensitive adhesives like 3M 467MP and 468MP.
Applications exposed to vibration, mechanical loads, or repeated thermal cycling may therefore require additional clamps, retainers, fasteners, or other mechanical support.
Summary
Material manufacturers' recommendations for surface preparation, adhesive installation, operating temperature, storage, and environmental exposure should always be followed.
Engineers should also plan for at least one design iteration whenever practical. Thermal calculations and simulation are valuable, but testing the heater inside the actual production-intent assembly provides the clearest picture of temperature distribution, warm-up time, heat loss, and potential hot spots.
Working with a custom flexible heater manufacturer early in development can also help identify issues involving heater geometry, resistance zoning, materials, mounting methods, sensors, and watt density before the mechanical design becomes difficult to change.
Key Takeaways
- Uniform heater watt density does not automatically produce uniform system temperature.
- Conduction is usually the primary heat-transfer mechanism, making direct physical contact critical.
- Air gaps, adhesives, surrounding materials, and thermal mass can significantly affect temperature distribution.
- Custom resistance zones can compensate for different heat loads across a complex assembly.
- Prototype testing in the final assembly is one of the most important steps for validating heater performance.